
|
  
|
||||||||||||||||||||||||||||||||||||||||||||||||||||||||||||
| Basics
Introduction to Modeling - Materials - Tools - Theories & Ideas 
Modeling is as old as civilization itself. Since the first cave person whittled an animal out of bone, there has been modeling. On that grand introduction, welcome to the world of modeling. Model building is essentially creating something that represents another thing, usually in a smaller scale. You are making your own version of reality in a small, and easy to handle package. Modeling takes two basic forms. Building from scratch and building from a kit. Building from scratch, or "Scratchbuilding" is usually associated with the commercial world. Firms build models of buildings and land developments to help sell their ideas to their clients. Scratchbuilding can also be performed in the home to create models of subjects for which there are no kits. Building models from kits, what this site is dedicated to, is usually associated with the individual hobbyist. People all over the world purchase models in kit form and assemble and paint the pieces to create a finished model. Since this is the main focus of this site, model kit building will be what you learn about. Building models from kits is a relatively new hobby. People have built models from scratch forever, but it wasn't until the Industrial Revolution, and mass production, that kit building could happen. It started with simple metal soldiers cast from molds. Then it moved on to assembling model railroads and architecture. Modeling took a whole new form when blanks of wood were supplied to modelers with plans to cut and assemble them. Here was the ability for the average person to construct a decent replica with already available pieces and instructions. But with the combination of the Injection Molding Machine (invented in 1872 by the Smith & Lock Company) and cellulose acetate plastic (produced in 1919 in Germany), a whole new era of model kit building was born. The technology quickly evolved into bigger and
better things. Polystyrene plastic (perfected by BASF in the 1930s) became
the dominant form in which model kits were made. The process by which
these kits were, and still are, made is called "Injection Molding",
as mentioned before. The liquid plastic is forced into a mold at high
pressure, and the plastic then changes state to a solid during cooling.
This process revolutionized kit making. It allowed kit manufacturers to
create molds of all the pieces and parts of a model subject, and quickly
reproduce copies of them. The result was a commercially available product
that allowed anyone to take the pieces off the "sprues", or
connecting trees, glue them together, and have a highly accurate and detailed
model. Plastic injection molding allowed greater detail and accuracy than
anything previous. The model kits you buy today are produced in essentially
the same way as they have always been. Granted, computers and sophisticated
3D modeling and milling have replaced much of the previously hand operated
processes, but the basic idea is the same. Injection-molded styrene is not the only material model kits are made of. There are many different materials kits can be made of from, but there are four major mediums that seem to be the most common. They are: styrene plastic, resin plastic, vinyl plastic, and white metal. Other, less popular materials include wood, photoetched brass, plasters, and paper/cardboard. Styrene plastic kits are most common. These are made by the big companies like ERTL, Revell, Tamiya, and more. These are almost always mass produced by a large company as the tooling process involved is very expensive and beyond the reach of "garage companies". Styrene kits, more commonly called "plastic kits", usually have a lot of parts and can hold very nice detail. The parts, if from a quality company, usually fit together well and have locator pins or other guides to help assembly. Overall, plastic kits are easy to assemble and, depending on the part count, can be completed by just about anyone. They are the perfect starter kit. The range of subjects in plastic kits vary greatly as the number of plastic kits produced numbers in the millions I am sure. Plastic kits also readily accept all types of paint and glue. But be careful, some solvent glues can melt plastic. Resin kits are more prevalent in the garage industry, where small companies or individuals produce limited runs of kits. Resin is a form of plastic that is made by mixing two liquids together and pouring them into a mold, where the resin hardens and takes the form of the part. There many different types of resins, all with individual properties. Some are very good and some are very bad, it's up to the manufacturer to decide what to use. We are stuck with what they choose. Resin kits usually come in less parts as casting many parts can be expensive. Resin is a more difficult medium to work with as it often requires intense sanding, seam filling and cleanup of the parts. Making a resin casting from a mold can be tricky and often times the parts have imperfections. It is up to us as modelers to fix these. Resin is also heavy as most parts are cast solid. Parts alignment is also more difficult than styrene plastic as there aren't usually alignment guides or pins like on a plastic kit. A resin kit should not be the first kit you build. The range of subjects available in resin is almost as numerous as plastic. The resin cottage industry has exploded in the last few years and many new subjects are available. Conversion kits or add-on detail sets are often cast in resin as well. Resin kits, like plastic, also accept all types of paint and glue. Vinyl kits, also known as PVC plastic kits, mostly come in the form of figures and creatures. Vinyl is a very pliable and flexible material that is suited more towards clothing and flesh than hard bulkheads and small details. Vinyl kits take a lot of work to prepare them for assembly. Most parts are cast with large amount of extra vinyl on them that must be removed with an X-ACTO knife. Be sure to warm the part before trimming! Vinyl kits usually have the least amount of pieces. Vinyl kits, depending on the company that makes them, can take some careful seam filling and parts manipulation to make everything fit properly. Vinyl is not an easy medium to start with. Vinyl kits should only be painted with water-based paints (at least the first coat), and glued with super-glue or epoxy. Solvent based glues will not work. White-metal kits encompass a large grouping of materials.
Like resin, there are many types of metal that can be used to make casting
of parts. The main difference is the hardness and melting point of the
metal. Metal kits are made by melting the metal and pouring it into a
mold to create a part. Some kits are also die-cast. This produces a much
higher quality kit. Another type of metal used to make kits or detail
sets is photo-etched brass. This is an entirely different process, however,
and is not included under the "white-metal" group. Most all-metal
kits are small. Metal is very heavy and anything too large is impractical.
Metal is usually used just to make a couple of parts in a kit. Most kits
are not made entirely of metal. Metal is hard to work with as sanding
and modifying it is very difficult. It also does not reproduce details
as good as plastic or resin so is somewhat undesirable. Metal can usually
accept all types of paint, but must be glued with a super-glue or epoxy.
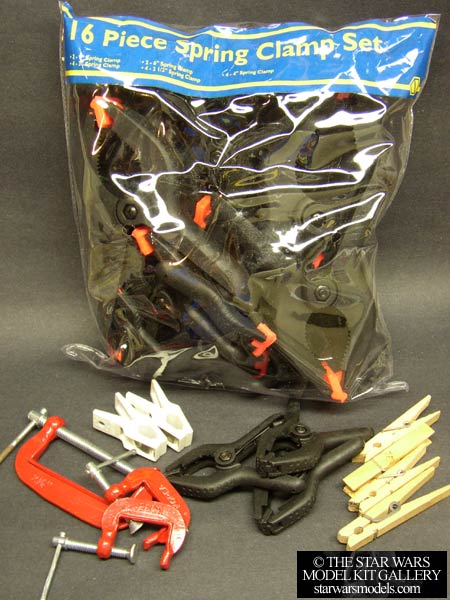
Tools are one of the most important aspects of model building. Without the proper tools, you will find yourself having a difficult time and becoming extremely frustrated. I struggled for years without having any good tools and I can not imagine ever going back to anything like that. That is why I have comprised a short list of all the essentials. Of course this does not include everything you'll ever need, these are just some of the tools you will need to have fun with model building and create wonderful replicas:
Model building is not just a mechanical process of cutting parts from trees, gluing them together, and then painting them. There can be much more to modeling if you so desire. I'd like to offer up a few of my insights and thoughts on model building. First off, model building is a hobby. Hobbies are supposed to be fun and enjoyable. When I build models, I do it to have a good time and to relax. It can be great stress relief and an even better way to bond with others. If model building ever stops being fun for you, don't do it. The point is to have fun. You can't expect to be happy with the finished results if you didn't have fun building the kit. As the saying goes, it's the journey, not the destination. Secondly, you can't expect to make perfect models every time. If you expect this of yourself, then you will cease to have fun as you are always trying to achieve the unachievable. You have to be willing to make mistakes and accept it. Only then can you learn from the experience and grow as a modeler. Successful modeling consists of three basic principles: having the right tools, having the right technique, and having the inspiration to want to build models. Once you have all three, you will be able to do whatever you want and enjoy your time building models. Lastly, you don't have to listen to a word I say if you don't want to. Like I said, modeling is supposed to be fun. So go out and have fun. ;) |
||||||||||||||||||||||||||||||||||||||||||||||||||||||||||||
|
Copyright © 2001-2016 starwarsmodels.com.
No portion of this site is to be reproduced in any way, shape or form without
my permission beforehand. |
||||||||||||||||||||||||||||||||||||||||||||||||||||||||||||


